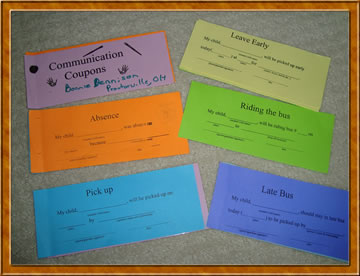
1. Communication Coupons (Bonnie Dennison Proctorville, OH)
Prepare coupons similar to those shown and give them to parents the first of the year. The color coding will really help with classroom management.
Orange – Absence
Turquoise – Pick up
Green – Riding the bus
Blue – Late bus
Light blue – Let’s talk
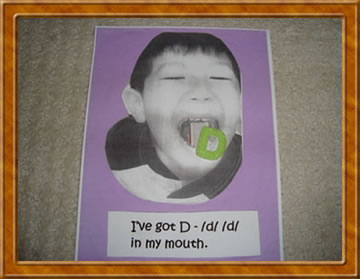
2. “The Alphabet in My Mouth” (Jennifer Cates, Sedalia, KY)
When making the book to go along with the song “The Alphabet in My Mouth” put Velcro in the mouth so you can change the letters. Use pictures of the principal, special teachers, etc. to make all 26 letters.
3. childcareland.com
- Oh, my goodness! This website is awesome! You’ve never seen
so many great printables!
Here are some other sites teachers recommended:
eichild.com – printables for your classroom
senteacher.org – British website with more free activities
4. One Hundred Day Caterpillar (Donna Franklin, Louisville, KY)
Make a caterpillar head and then let one student put up a number each day. Make the 5’s red and the 10’s blue. Every day count how many days you have been in school. You can decide each day if you will count by 1’s, 5’s, or 10’s. Make a special 100 circle.
*Hint! This will cover over 2 walls so put it up high on your wall.
5. I Love You! (Sheila W.)
Here’s another way to say, “I Love You!” in sign language. Kiss your fist and then point to a child. Sweet!
6. Our Town Blocks
Take photographs of the post office, police station, school, and other stores and places in your community. Tape them to unit blocks so children can use them in the block center to build and drive around with little cars.
7. dollartree.com (Melissa Freshwater)
Did you know you could buy items in block at dollartree.com? Melissa bought sets of tiny magnetic letters for all the students in her class. They kept these in Altoid tins and used them for phonics activities and word games.
8. Line Up Symbols
Place window cling pictures on the floor. Assign a different child to each symbol. When it’s time to line up they’ll know just where to stand.
9. Sponge Bob Cheer (Kara Furr)
“Get your elbows up.” Stick up thumbs and bend back elbows.
“I’m ready! I’m ready! I’m ready! I’m ready!” (Quickly move elbows up and down as if running.)
10. Top, Middle, Bottom (Kathy Smith, Nashville, TN)
I touch the top, top, top of my head, head, head. (Touch head.)
I touch the middle, middle, middle of my body, body, body. (Touch waist.)
I touch the bottom, bottom, bottom of my toes, toes, toes. (Touch toes.)
And I’m done, and I go and do it again.
2nd time repeat a little faster.
3rd time repeat a little faster.
4th time end by saying, “And I’m done and I’ll go and do it… tomorrow.”
(Wipe forehead, smile, and laugh.)
This can be adapted to help children learn the top, middle, and bottom of the page.
I touch the top, top, top of the page, page, page.
I touch the middle, middle, middle of the page, page, page.
I touch the bottom, bottom, bottom of the page, page, page.
11. I Can Read 100 Words! (Adriane Sheffield & Delta Paschall)
Start this project by reading “I’ll Teach My Dog 100 Words.” Give each child a pocket folder and add 10 words per page. Start with color words, names, number words, shapes, sight words, seasonal words, etc.
12. Blends (Amber Beam)
Use a divided plate for letter blends. Children place letters in the smaller sections and then select pictures of objects that begin with that sound and put them in the larger section.
13. It’s Time for Us to Go (Arlene Middendorf, FL)
Sing this song to the tune of “The Farmer in the Dell” to end your day:
It’s time for us to go.
It’s time for us to go.
Say good-bye to all your friends.
It’s time for us to go.
We’ve had a busy day.
We’ve learned a lot today.
Say good-bye to all your friends.
It’s time for us to go.
Children select the symbol for how they will go home and line up.
Walkers – Feet
Car Riders – Car
Bus Riders – Bus
After School – Schoolhouse
14. Squishy Bags (Amber Oakley, New Harmony, IN)
Put ¼ cup of finger paint or colored hair gel in a Ziploc bag. Seal the bag and let children write and erase with their finger or a Q-tip.
15. Large Floor Games (Amber Oakley)
Use window shades to make Twister, swat, and other floor games. Roll them up and store them in a waste basket.
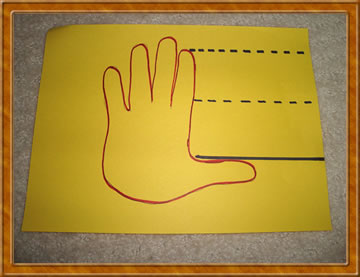
16. Hand Writing (Amber Oakley)
Use your hand as a guide when learning to write. Stick fingers straight up and the thumb to the side as shown in the illustration. The index finger would represent the top dotted line, the knuckle the middle dotted line, and the thumb the bottom line. Children could write letters or numerals using this technique.
|
